Getting Started with FL Studio: A Beginner's Guide
Posted by Esteban Miranda on
FL Studio is a huge DAW with a lot of amazing features.
In this guide you'll learn how to use FL Studio as a beginner.
The basic layout of the software.
The functions and menus.
How to understand what you're seeing so you can get to making music!
So if you're a beginner in FL Studio, you've come to the right place.
Let's dive right in!
What is FL Studio?
FL Studio is a music production software with a distinctive look and feel. The main beauty about FL Studio is how customisable it is. Nothing is fixed in place except for the main toolbar along the top of the screen, so you can customise the look and the workflow to suit your style.
Nothing is fixed in place, so it is a really good idea to get yourself familiar with what each section of FL Studio does so you can decide how you want to configure things for your workflow.
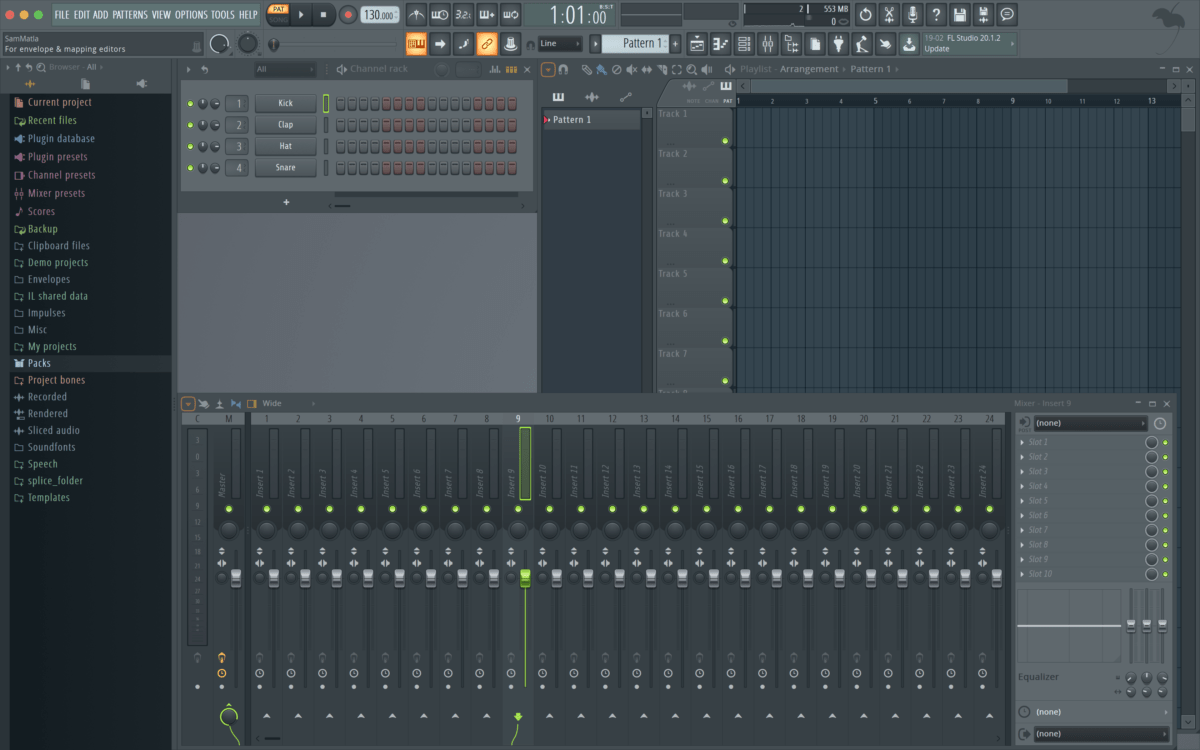
Evrything you see in the above image can be moved around, which makes FL Studio quite different from what some consider its nemesis - Ableton Live.
The workflow in FL can be unique to you, so let's dive into it to see how things work.
We'll cover the Transport Bar first.
The Transport

The basic controls we should all be familiar with are Play, Stop and Record. These shouldn't need any extra explanation, I'll assume you know what these mean!
Next to the transport buttons you can see two smaller ones; one PAT and another SONG.
These buttons allow you to toggle between showing the Channel Rack and the Arrangement sections, which we will come to in due course. The main thing to remember about these two though, is that switching between them allows you to move from a more sketching out ideas workflow with PAT to creating more of a big arrangement with SONG.
Also present in the Transport Bar we have various time controls and displays, which is where you'll be able to visualise the time in your music, as well as how much work your computer's CPU is doing.
Where there is a small menu saying Line, this is your Snap control. This controls the quantisation of all your music on the piano roll and arrangement.
What is quantisation?
Quantisation is the process of making sure your music snaps in time to a designated time interval, and you can control the levels of quantisation yourself to fit your needs.
The Browser
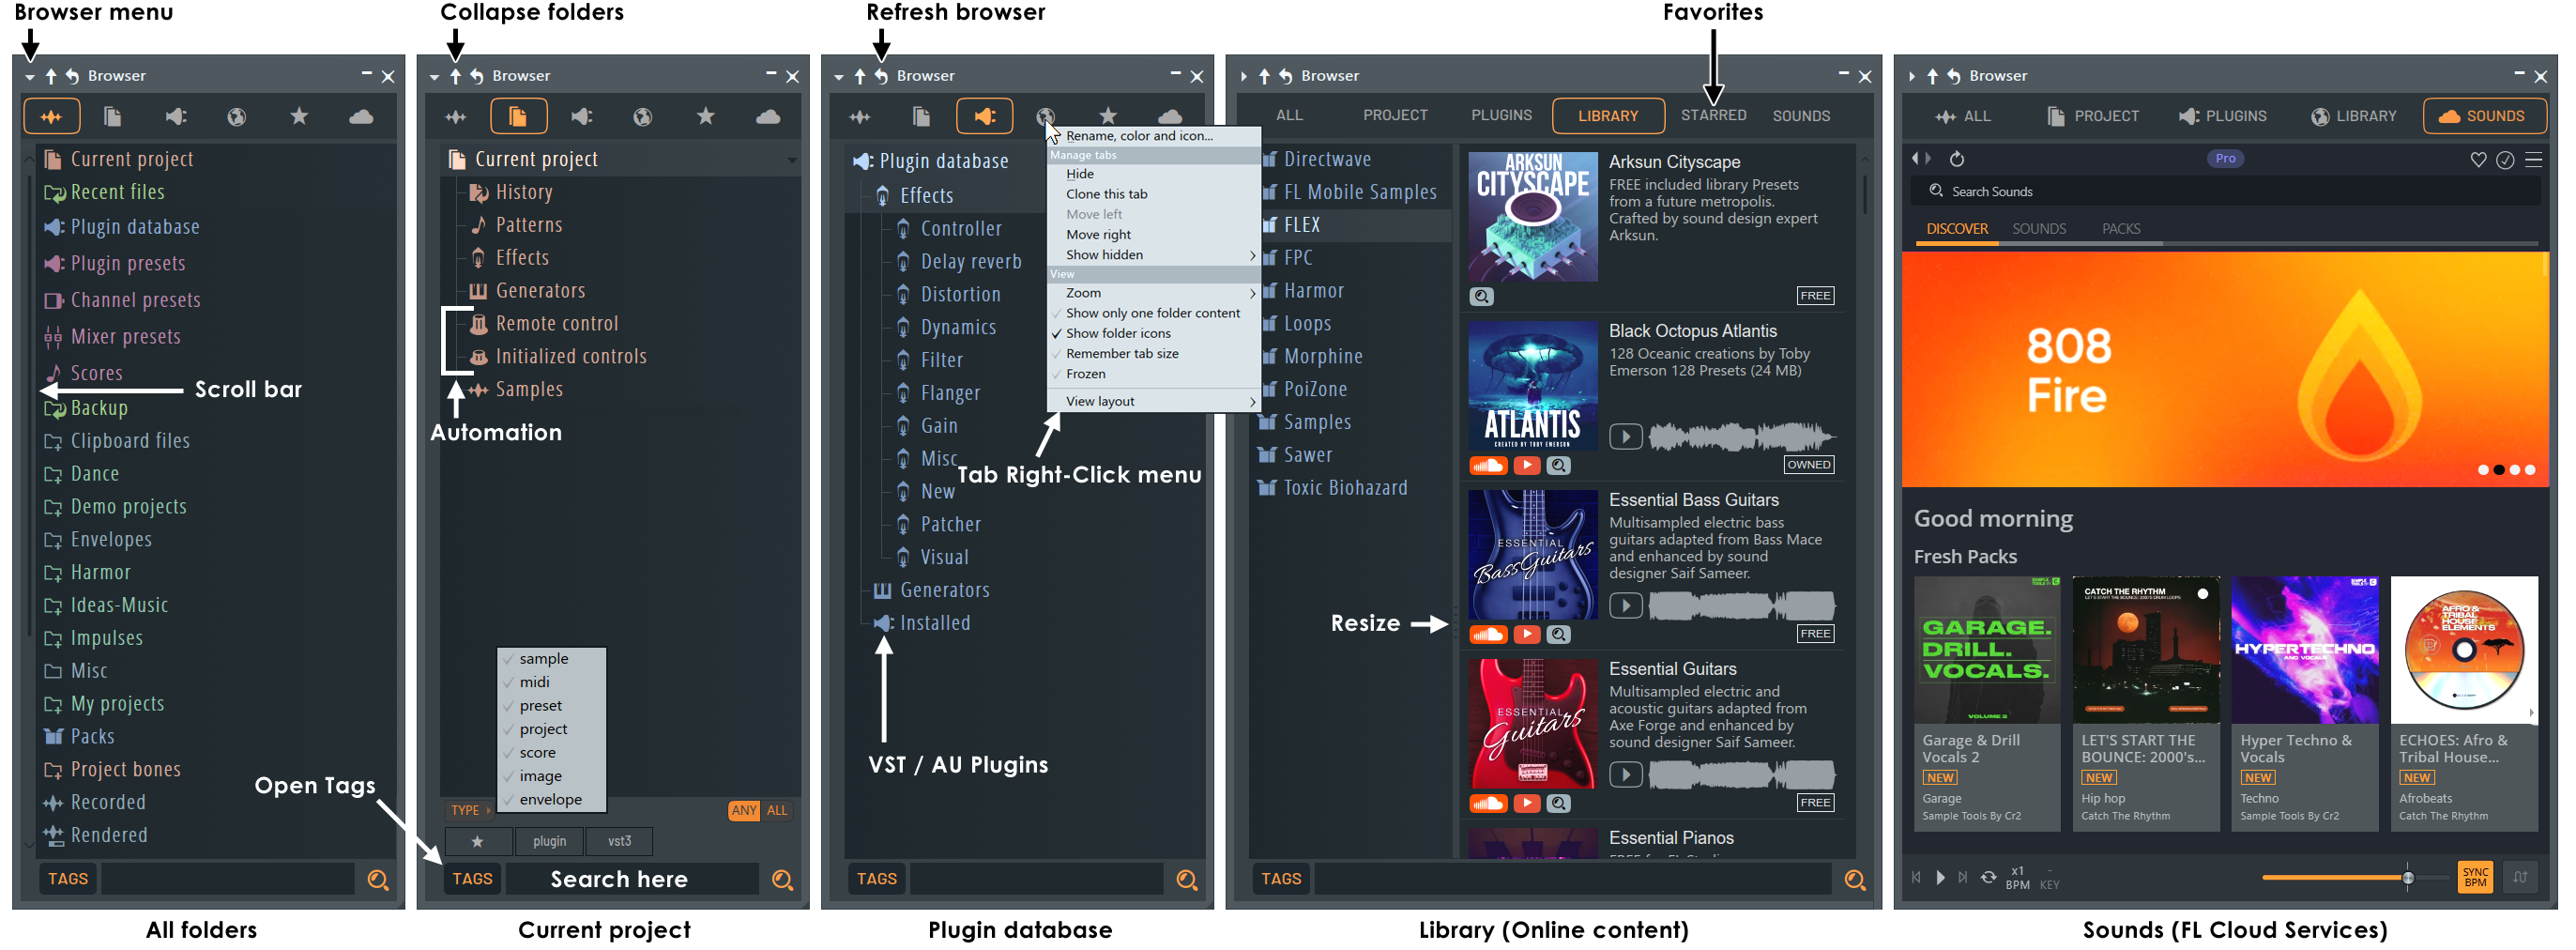
This is your hub for locating projects, samples, local and online content libraries, plus your VST/AU plugins.
It's worth noting here that FL Studio's Browser will only search for files in folders you've added to it. You have to manually add your folders, so we're talking samples, plugin folders, basically any personal folders you want to include in the browser. The simplest way you can do this is by just dragging and dropping the folders you want from your Operating System's file browser directly to the FL Studio Browser. Once you've done this, you'll have all the folders you need quickly accessible from the Browser.
You can also add your own sounds and samples by heading to Options>File Settings and clicking on one of the spare folder slots, which opens a window allowing you to choose the folders you want to include in the browser.
So, let's break down a few of the Browser's main sections.
If you're new to FL Studio, or music production in general, a good place to start is the Packs Folder. This is where all of FL Studio's default sounds live. There are drum sounds, loops, FX and more. Don't get too hung up on using preset sounds to begin with, because they're a great way to get the hang of things before you move onto using your own sounds. Some people consider the use of presets "cheating", but I'm not one of those people, and you'll find they're a great way to get your head around the other aspects of making music.
Once you've selected some sounds to use, you'll be working in the Channel Rack section. We will cover this later.
Another key section of the Browser is the Current Project folder. You can navigate to this either by hitting the name in the browser window of the paper sheets icon at the top of the browser. The Current Project folder will give you all the info on sounds, automation clips, actions and anything else going on in your current project.
Another key area will be the Plugin Database, this is accessed by hitting the "plug" icon at the top of the browser, or by navigating to the folder itself. This section shows you all of your plugins, whether they're effects or instruments. Third party plugins will also be here.
This will be your go to folder for finding the material you're working with quickly, without having to dig through subfolders again and again.
You're going to be spending a lot of time using the Browser, so it's worth taking the time to familiarise yourself with the different folders, how to access the ones you need, and where your go-to samples or plugins are stored.
Now, when you're sketching out musical ideas in FL Studio, you'll be working in the Channel Rack, so let's explore that section next.
The Channel Rack

Pictured above, the Channel Rack is where you'll sketch out musical ideas. It's your musical playground where you can experiment before committing to a fully fledged track structure. The Channel Rack is one of the most important areas of FL Studio, and a solid case can be made for this being the element that, above all else, sets FLS apart from other DAWs.
The Channel Rack holds instruments which create the sounds, and internal generators which control automation.
FL Studio's Channel Rack works with patterns. These are defined as a sequence containing the note and automation data visible across all channels.
So you can make a pattern in the Channel Rack which consists of several channels, whether they're drum loops, simple melodies, or more complex harmonic material using a Piano Roll.
The Step Sequencer in the Channel Rack is one way of making patterns, while you can use a traditional piano roll too.
Each Channel in the Channel Rack is linked to a Mixer Track for level mixing and effects processing.
Now, you can simply drag sounds from your sample library in the Browser to create a new Sampler in the Channel Rack, or you can use a VST instrument instead.
There are a lot of controls in the Channel Rack menu, which you can access via the disclosure triangle in the top left, many of which are self explanatory, so be sure to have a play around with these, and take a deep dive into the FL Studio manual if you're unsure on a specific function.
There's a Loop Mode button, which is on by default, and that's the small curved arrow next to the menu.
The button labelled All allows you to select different groups of channels, while the plus sign at the bottom is where you add in a new channel.
So, while the Channel Rack is an important part of your music creation process in FL Studio, you'll be spending a lot of time in the Step Sequencer, which is housed within the Channel Rack.
FL Studio's Step Sequencer & Piano Roll
I mentioned in the previous section that the Channel Rack is where you sketch out your ideas. The Step Sequencer is your sketchbook!
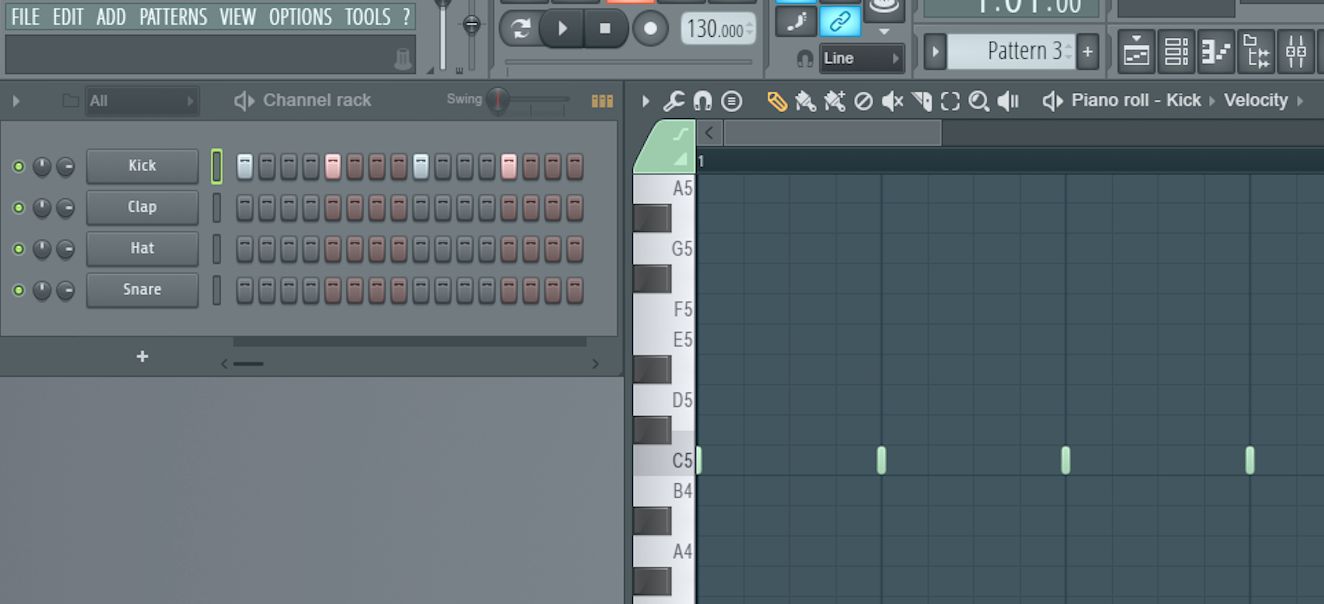
The Step Sequencer and the Piano Roll are two areas where you'll be spending a lot of time making your musical ideas, so it's worth spending the time in these areas to get yourself familiar with them.
First we will look at the Step Sequencer.
You can see in the image above, the sequencer is made up of different steps, some of which are activated (these are the ones "lit up").
To add in a step, simply left click on the box. You can click and drag to activate multiple, and to delete a step, right click it.
There is a small LED next to the label for each channel, and when this is clicked on, and/or lit up, it means you've got that channel selected. You can then apply some of the menu settings which are applicable to that channel.
Right clicking a channel's LED indicator will solo the channel, while left clicking will turn it on or off.
There is also a panning and volume knob next to each channel, which allows for on the fly mixing without having to open the separate Mixer Window. You'll notice a number next to each channel, which indicates the routing the the channels in the Mixer. We will cover this in the next section.
There are a few more key controls you're going to need when using this section.
The Graph Editor is one of them, which you bring up by clicking the bars icon in the top right. You can see this pictured above under our Chanel Rack heading.
The Graph Editor allows you to adjust velocity, pitch, panning and other modulation parameters in a detailed way for each step in your pattern.
There are also controls present which allow you to adjust the length of the pattern in 16th notes, the default being 16. As well as this, there is a swing control, which allows you adjust the swing of your music to give it more of a groove.
Using the Step Sequencer, you can create patterns easily and intuitively. It's definitely best for rhythmic patterns, so if you're wanting to create more melodic or harmonic ideas, you'll want to work in the Piano Roll.
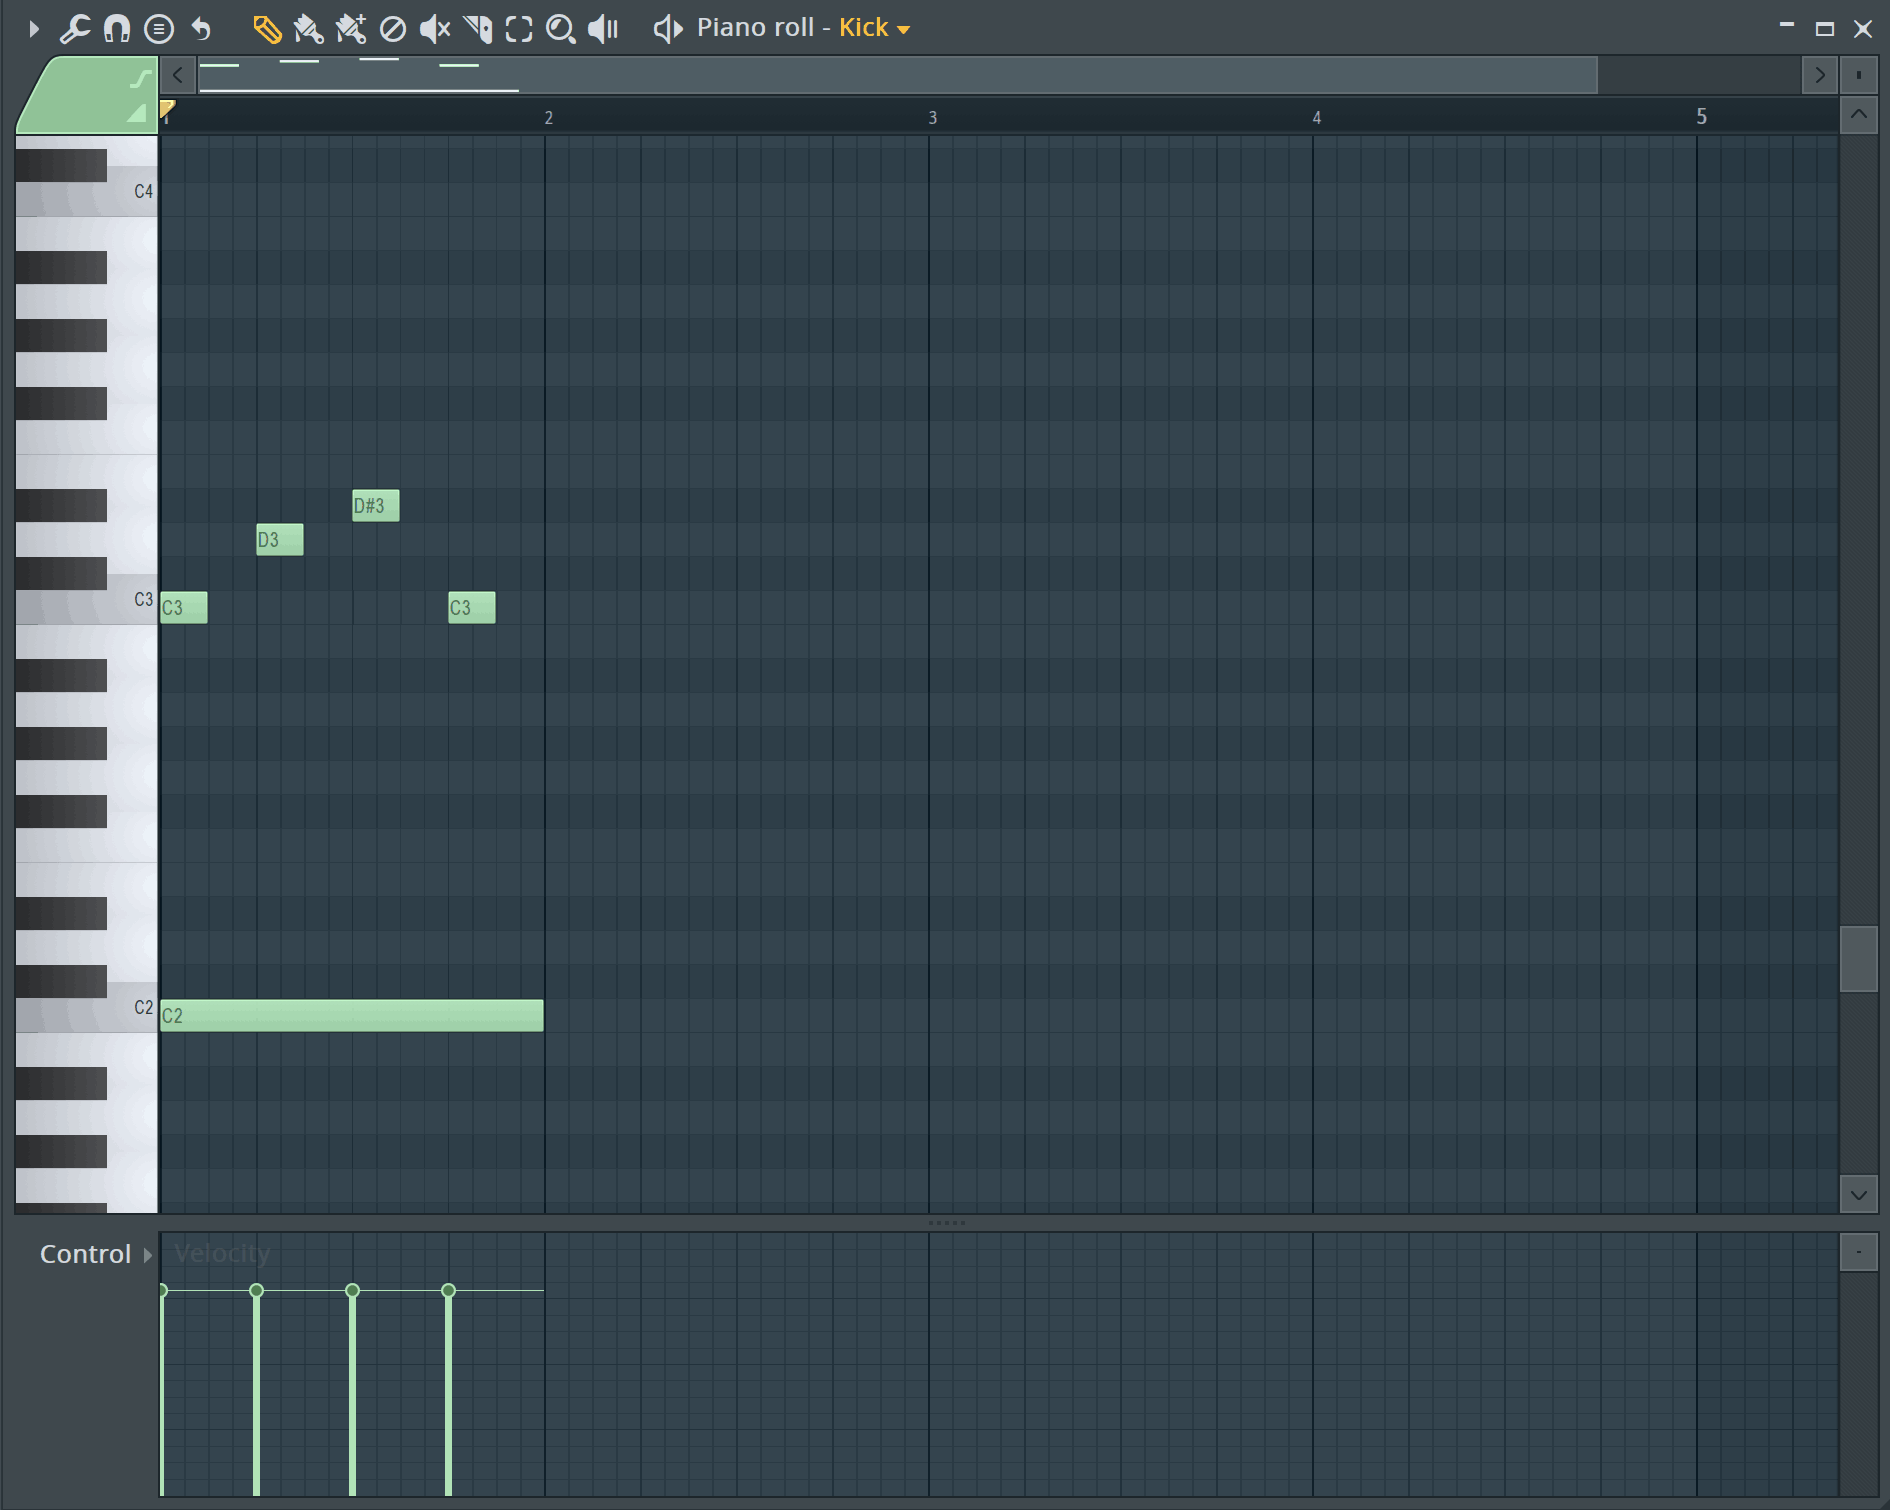
The Piano Roll in FL Studio is legendary for how powerful it is, and how many features are packed into it.
It's perfect for writing melodies, chords and more complex rhythms and patterns.
The basic input of notes is the same as in the step sequencer; you click to add in notes, and you can drag them up and down to change the pitch, or from the end to lengthen the note itself.
The lane you can see along the bottom is where you can edit the velocity of the notes in the Piano Roll. You can adjust this by clicking and dragging, as well as selecting an option from the Control dropdown menu to change what it is that you're altering.
Now, where the Piano Roll in FL Studio really shines is all of the functionality and controls built right in.

The above screengrab is a collection of some of the controls present in the Piano Roll. They are as follows:
- Draw: pretty self explanatory; allows you to draw in notes and move them around
- Paint: paint in notes and repeat them (by dragging)
- Paint (Sequencer): paint in steps and repeat them (by dragging)
- Delete: remove notes by clicking on them
- Mute: deactivate certain notes by clicking on them
- Slice: break notes into multiple parts by clicking and dragging a line
- Select: click and hold to select a group of notes
- Zoom: click to zoom in on all notes, click and drag to zoom into a specific area
- Playback: one of my favourite features, allows you to hear what notes are playing at a given time by clicking
The Piano Roll is where you'll be making most of your melodic content, so it's worth getting to know all of the features available to you. Once you've got your patterns and ideas worked out, you'll want to move things over to the Playlist.
We will look at this section next.
The Playlist
If you've ever used any kind of music making software, this section should be most familiar to you.
As a long time user of Logic and Ableton, and a relative newcomer to FL Studio, it's the area that seems most familar in that it's a pretty standard, timeline based way of working.
Once you've worked on your ideas in the Channel Rack, you'll bring them over to the Playlist and use this section to build your arrangement.
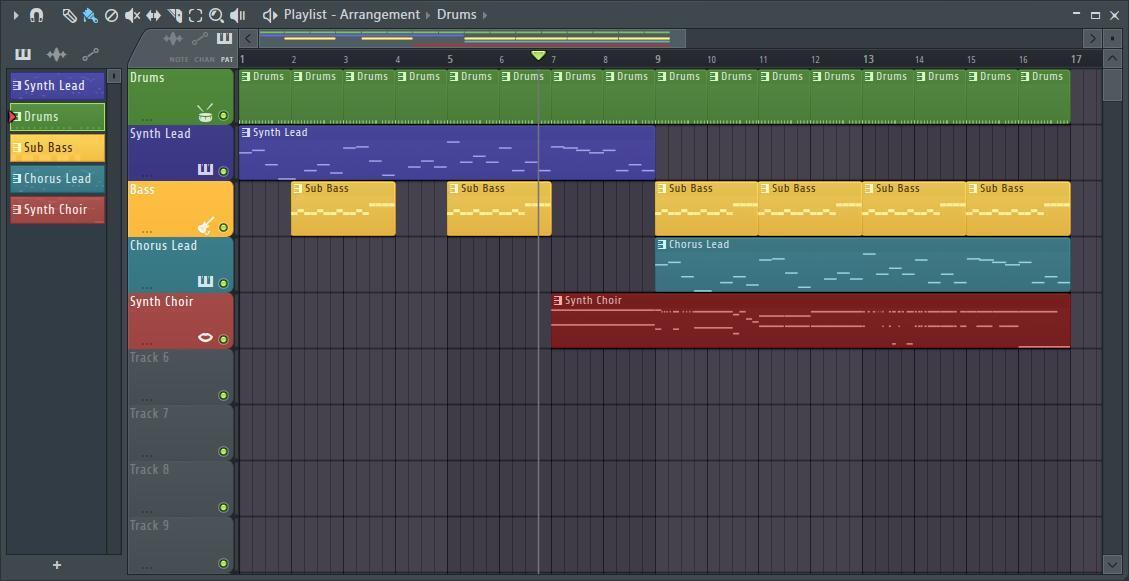
On the left hand side of the above image you have the Picker, where any patterns you've made in the Channel Rack are available to drag and drop into the Playlist. You can place them onto any track in the Playlist; there's no set way you have to organise things.
This is how you'll create your song.
The Playlist allows you to play with more than just patterns; you can drag audio samples and loops directly into the Playlist, and using this section you can really begin to build your ideas into a proper song arrangement.
You can resize and label tracks, so your arrangement works exactly how you want it to.
The menu for the Playlist is in the top left, with a variety of controls for you to look over. We won't go into these here, check out the FL Studio manual for more detail!
Once you've got your general structure organised, the next stage of making your track is the mixing stage.
The Mixer
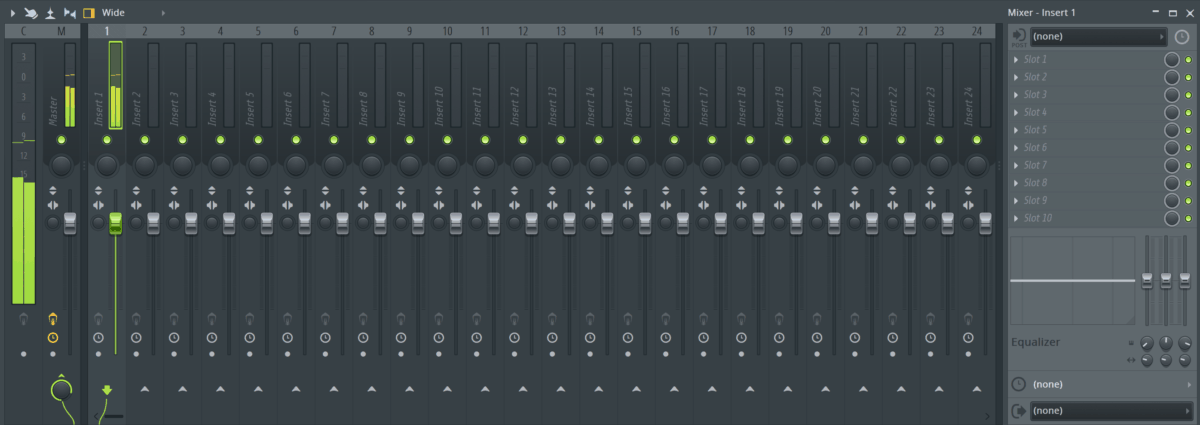
The Mixer is where all of the signal processing and volume balancing happens.
FL Studio's Mixer has some great routing and processing capabilities, so let's dive into some of the main ones.
The first piece of info you need is that each track on the mixer is assigned to a mixer track from the Channel Rack, but you can select the routing yourself if you need things arranged differently.
The main output level is shown on the far left, with all of the other mixer channels in the window as pictured above.
For each individual track, you have a mute switch, a volume fader and pan controls. These control whether the audio is in the left or the right of the stereo field. There is also a Stereo Imager for making things sound more stereo or mono and other switches that are more advanced.
These are the main controls you'll be using to work on your mix; balancing volume levels and panning will allow you to balance the levels to your liking.
Each channel will have a green routing line down at the bottom, which goes straight to the master output by default.
Inserts & Plugins
This is by no means a chronological list of the process of making music. You'll be jumping between different windows and different processes as you make your tracks.
But Inserts & Plugins are a key part of making music.
You can see in the mixer image above, the Inserts section is on the right hand side. This is where you'll add your FX to different tracks in your mixer.
You can use some of FL Studio's built in plugins, as well as third party plugins too.
You'll see the slots in the Insert section, and these are where you left click to add an insert.
FL Studio has a great selection of FX plugins, depending on which edition you have, but some of the main ones you'll be using from a practical standpoint are;
Fruity Parametric EQ2 - An EQ Effect
Fruity Limiter - A Limiter / Compressor Effect
Fruity Reeverb 2 - Reverb Effect
Fruity Delay 3 - Delay Effect
You'll also be able to use third party plugins, which you can add simply by heading to Options > File Settings and clicking on Manage Plugins.
FL Studio has a Find Plugins button, which searches your computer for relevant plugins, and it will then list all the plugins you have installed.
Once you've added your plugins, you can access them from the Browser > Plugin Database.
Get Creating!
So, this was an overview of the main areas of FL Studio, and hopefully it gave you a solid foundation from which you can build a detailed knowledge of how FL Studio works.
It's a powerful program, full of amazing functions and features, so be sure to spend as much time as you have exploring the menus and seeing what you can come up with in FL Studio.
Thanks for checking in with us here at flpstudio.com, and while you're here you should check out our collection of FL Projects. These are detailed recreations of top tracks in FL Studio, and you can download these to get a detailed look into what makes a fully professional quality track. Get your hands on all the techniques and tricks that make a top level production pop!
Be sure to check back in with us soon for more resources and info on FL Studio!