Maximizing Your Workflow in FL Studio: Best Practices
Posted by Esteban Miranda on
Workflow seems to have become a bit of a buzzword in recent years, you know it is when all the YouTubers are claiming to found the ultimate workflow hack! But behind this algorithmic clickbait is a really useful concept to get your head around.
For some of us, the time we get to spend on our music production is woefully little, especially compared to the amount of time we may have gotten to spend on it in the past. I used to have seemingly limitless time to sink into my music productions when I was in my late teens and early twenties, but now as the reality of adult life - work, parenting, generally living your life - takes its toll, those hours I can dedicate to my music are withering away.
So, it is around this idea that we are going to focus today's guide. It's super important - especially if you're in the life stage that I'm in - to make your music making process as efficient as possible. You don't want to be wasting time in your DAW doing things slowly if there's a quicker and more efficient way to do them, after all.
So, in this guide we are going to look at maximizing your workflow, with a focus on FL Studio.
We will cover:
- Ways of identifying what your workflow actually is. People can work differently within the confines of their DAW, so finding out your way of doing things is key!
- FL Studio's unique workflow layout and options.
- Tips to help you create an efficient way of working in FL Studio.
- Plus, scroll down to the bottom of the page for a Comprehensive List of Key Commands for FL Studio! (Make sure you bookmark this!)
So, let's jump right in.
What's your Workflow?
As a producer it's important to figure out your own workflow, and it's a good idea to get an understanding of what a workflow actually is in order to do this successfully.
The term Workflow is defined as "an orchestrated and repeatable pattern of activity, enabled by the systematic organisation of resources into processes" which I think really helps to bring into sharp clarity exactly what we are talking about in this guide.
You have to figure out your patterns, your organisation, and your processes, which helps you work as efficiently as you can.
Each music producer's workflow will look different in some respects, but many will share similarities when it comes to the big picture. For example, every music producer's process will - broadly speaking - follow the steps of:
Generate an idea > develop the idea > mix your track > master your track
You should be able to see how this can be vastly different in terms of the minutiae, the smaller details and finer points of execution.
One of the big contributing factors to how you approach your music production workflow is your history. Did you come from a classically trained background? Perhaps you learned piano or a similar classical instrument as a child?
Or maybe you grew up playing drums in a rock band?
Alternatively, you could have no prior musical experience at all, and only have experience of creating music in a DAW.
The point here is that each of us will have a ton of life experience which directly determines how we approach our music production workflow.
Then it comes to the DAW in question. Logic Pro has a different set up to Ableton Live, which in turn has a different set up to FL Studio.
And FL Studio is famous for its unique approach to workflow, so let's dig into that a bit deeper!
FL Studio Workflow Overview
One of the most important things to bear in mind about FL Studio is that it is not like other DAWs in the way it approaches workflow. Programs such as Logic Pro, Cubase and to an extent Ableton Live adhere to a linear way of creating music (though Ableton Live famously has its Session View, and Logic Pro now has Live Loops, neither of which is linear in this way).
This Linear way of making music involves a timeline based arrangement window, which is named different things in different DAWs. In FL Studio this is called the Playlist.
While this linear timeline area is the starting point and home screen for most DAWs, this is not the case for FL Studio. If you open up Logic Pro, the "home screen" is this linear timeline, where you add audio or instrument tracks, and then record in and build your arrangement there. Everything is self contained as a panel you open over the top of this central screen containing your timeline.,
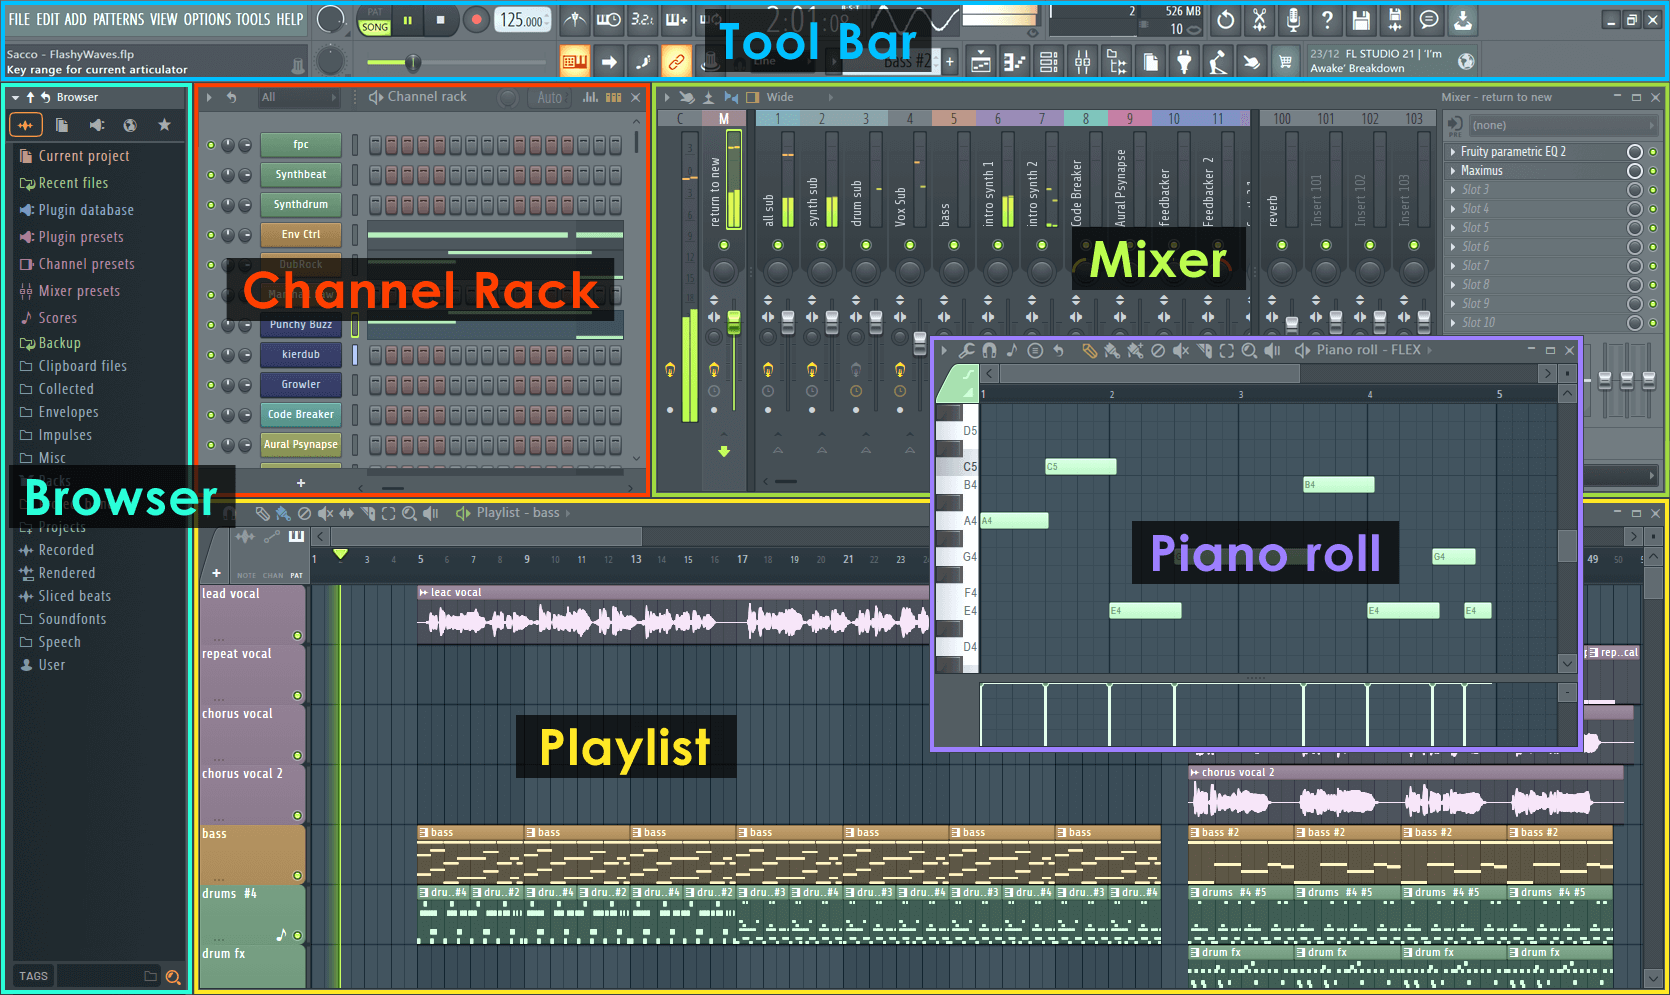
FL Studio on the other hand, works like a set of different mini programs which you open in your "desktop", which is the main screen of FL.
The remarkable thing about FL Studio when compared to other DAWs is that each area handling a different element of the production process resides in its own window, which can be minimised, moved around and resized. This type of workflow is unique to FL, and it allows for a unique way of working. It's possible to have nothing open inside FL Studio, and just be staring at a blank background, in the same way you could turn your Mac or PC on and not open any programs yet.
However, it's worth bearing in mind that it can be easy to get lost with all these floating windows, so if you hit F12, it will close all the open ones. You can also cycle between them using the Tab button, which is great if you're using plugins like Kontakt which you want to keep open, because opening and closing it can take a long time! If you hold Shift while hitting Tab it will cycle the other direction through your windows.
Another thing to bear in mind is that some windows will automatically close when you open other ones. If you don't want this to happen, just hold Alt when you click the channel or plugin. You can also make something a floating window, which means it's always there above everything else. To do this, go to the corner list and select Detached, or you can just hit D when the list is open. A cool tip if you're using multiple monitors; a detached FL window can be dragged outside the confines of FL Studio, so try dragging your mixer onto a totally separate monitor!
What makes this so unique and interesting is the fact that you can open one window at a time, thereby focusing your attention on different elements of the production process as and when you need to. Compared to other DAWs, this can be a very clean and efficient way of working. If there's one thing that can be said of all DAWs, it's that the screen can become very easily overwhelmed with visual information.
The first port of call in FL Studio is the Channel Rack, which is another unique section of the DAW, facilitating quick creation of musical ideas which are labelled as Patterns. On the surface it's a basic step sequencer, which isn't necessarily a unique piece of software, but the fact that this is where you generate all your musical ideas means two things. First, it's why FL Studio is beloved amongst electronic dance music producers, and second, it puts the focus right out the gate on creating musical ideas with no pressure to create a full track.
FL Studio's Piano Roll is housed within the Channel Rack, and is widely lauded as the best Piano Roll in the DAW world right now due to how many features and functions are packed into it.
The Channel Rack is just a place to essentially jam out some musical ideas, which you can then save as Patterns. You then use these patterns to create your song structure in the Playlist which is another of the windows in FL Studio, and you can then adjust your levels in the Mixer Window.
You'll be spending a lot of time switching between these various windows, so another great workflow tip I'll give you is this: Memorise the keyboard shortcuts (don't forget to bookmark this page because we have a huge list of keyboard shortcuts at the end of this guide!)

These all have toggle buttons in the top toolbar, which will conveniently light up when each window is toggled. However, using the keyboard shortcuts allows for more efficient opening and closing of the various windows, and allows you to focus your attention on writing the music.
As we mentioned, the Channel Rack is a window you will be using a lot. You can click in an open space in the work area to bring this up as well, so it's a good idea to try and leave at least one little space of background as it can be faster sometimes. Generally, if you're reaching for a specific menu more than 5 times in a session - which let's face it, you will be doing - learn the keyboard shortcut for it!
The Channel Rack
This is one of the most unique features of FL Studio, which is saying something since FL is a pretty unique DAW in itself!
The Channel Rack is where you'll begin sketching out your musical ideas, and it offers a completely different workflow option than those present in other DAWs.
What I personally find most interesting and fun about the Channel Rack is how it facilitates instant musical creation. This is true even if you're a newcomer; you simply click on a few notes in the step sequencer and can instantly hear results.
This isn't to say that the Channel Rack is simplistic, though. Far from it, in fact. There are so many features packed into it that it is a full fleshed out step sequencing mini-program in itself!
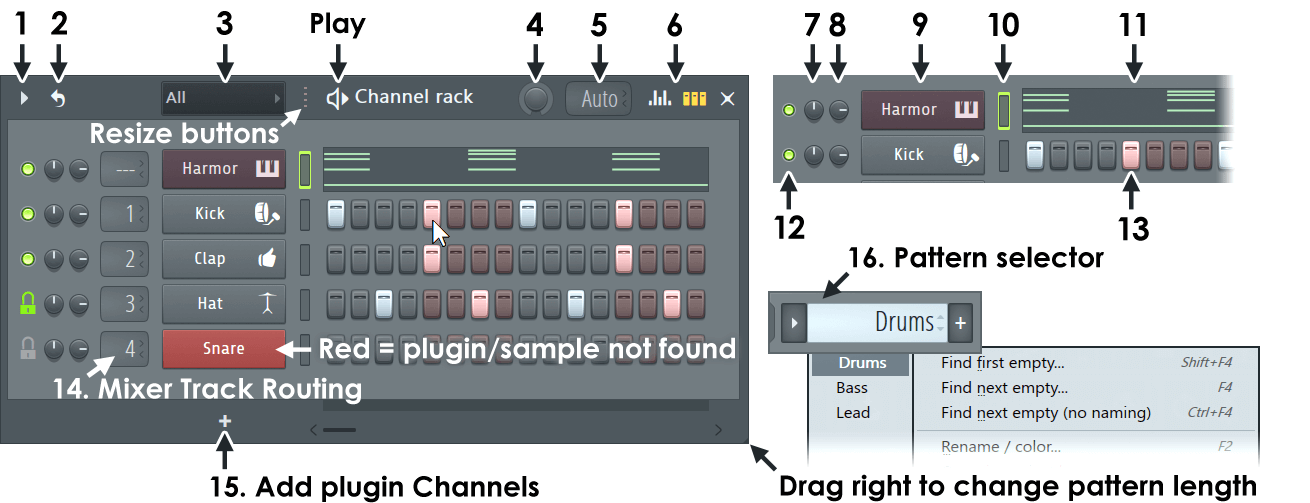
You can see in the image above, taken from Image Line's official support documentation, just how many features there are packed into the Channel Rack.
One of the best things you can do to increase the efficiency of your workflow is to learn how to get the most out of the Channel Rack, so here are a few tips!
A great way to do this is make full use of the Plugin Picker when you're working inside the Channel Rack. While you can use the list view to select your plugins, this is only really the most efficient option if you have a smaller number to choose from, once your number of plugins start to increase, using the Picker is a much better idea.
If you right click the + at the bottom (labelled 15 above) this brings up the Plugin Picker. Here you will have a picture of all your effects or generators, depending on which on you've picked, and you can select one from here.
However, here's an even better tip. Don't use your mouse.
Instead, simply start typing the name of the plugin or generator you want, and the picker will automatically select anything in your library with that name. You can then use the arrow keys to navigate, and Enter to select.
Other Channel Rack Workflow tips
One of the cornerstones of an efficient workflow is organisation. It's an essential if you're going to be producing music efficiently.
The Channel Rack is where you'll have all of your sounds and synths creating sounds, and it's from these that you get your patterns. However, things can quickly get overwhelming here, so it's a good idea to organise your channels into groups.
To do this, select the channels you want to group and hit alt + G, which will then group them together under one name.
At the top of the Channel Rack, there is a dropdown menu which says ALL. When you create and label a group, you can now access it through this dropdown menu.
The implications of this is that you can have your Drums, Synths, Sound FX and other categories all in separate groups.
However, if this isn't to your style, you can colour code your different instrument groupings instead for some quick visualisation clarity. I do this in Ableton and Logic Pro, and it helps me to quickly know what's what because I have a colour coding system for synths, drums and other elements of my project.
To colour code your tracks, you can select Color Selected from the arrow in the top right, or alternatively, middle click the mouse on the selected channel which allows you to name, colour and set an icon for the channel.
FL Studio's Browser Tips
FL Studio's Browser is another feature of this DAW that makes it unique and directly relates to the workflow when you're creating music.
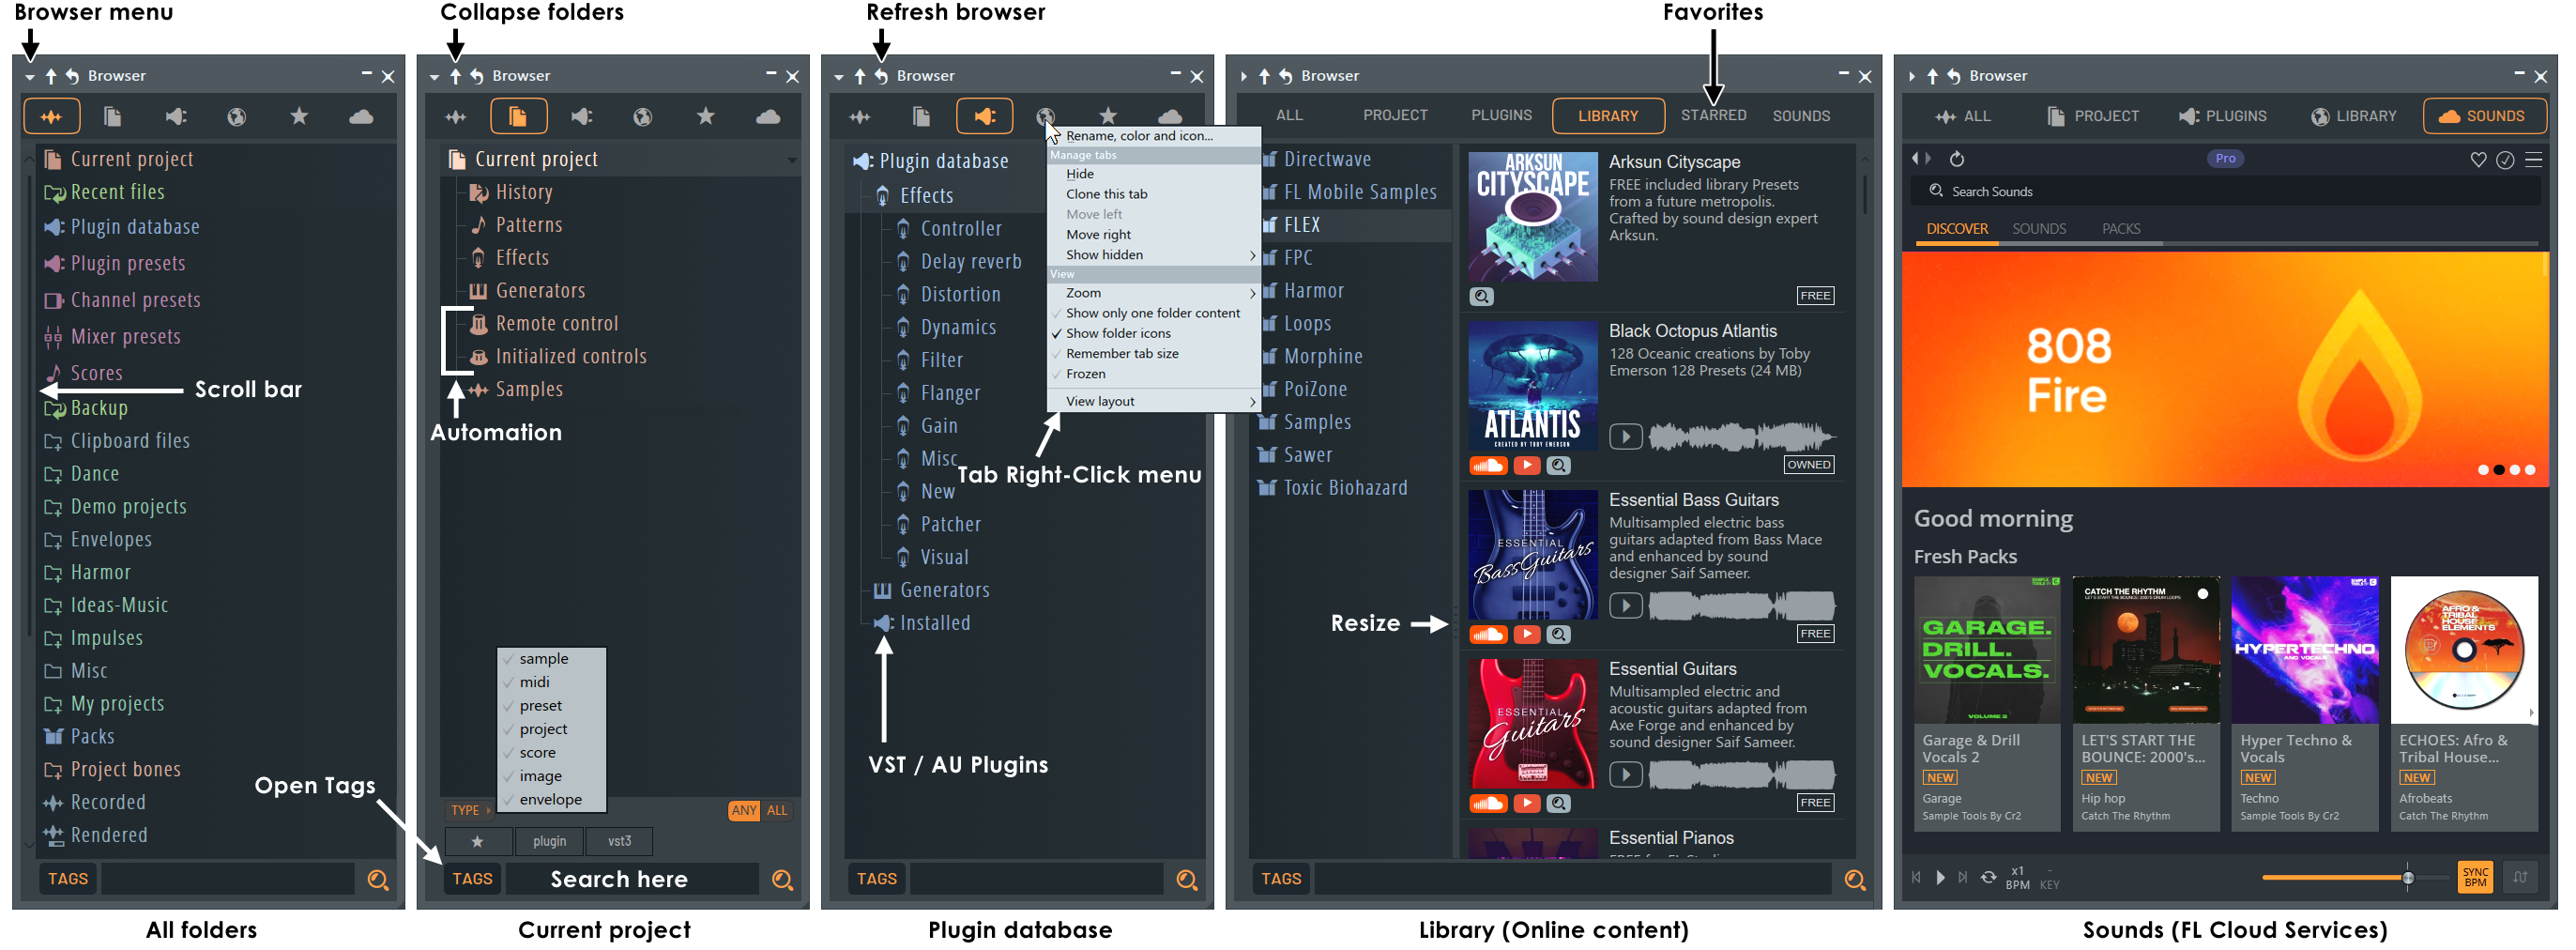
When it comes to a complex project involving lots of plugins, samples and audio files, the Browser in FL Studio is your one stop place to find everything you need. Using the Browser, you can access projects, samples, local and online content libraries plus all of your VST/AU plugins.
One of the best features of FL Studio is how much of it is user editable. This includes tabs along the top of the Browser.
Making proper use of the Browser is essential for an efficient workflow. KNowing where everything is, and how to get to it means you'll spend less time searching through menus and folders and more time on your music.
You can add custom folders to the Browser, but it's worth noting that by default, it doesn't include any of your personal folders. You can add any folders you want (such as your sample folder) to the Browser simply by dragging and dropping it from your Operating System's browser.
Using custom folders is essential if you want to speed up your efficiency. It's all well and good being able to add all the folders you want, but you need to ensure you've got a good organisation system in place too. The last thing you want is to be bogged down in a mess of cluttered and confusing folders which will actually slow down your workflow.
Using your own folders can help minimise this. Create custom folders for your own samples, your favourite plugins, and even for your project templates. To create a custom folder, just Right Click on the browser panel and select Add Folder. Then it's just a case of naming it and dragging and dropping the files you want to include in it.
But it doesn't stop there, you can create Subfolders within your custom folders to take your organisation one step further. Grouping samples by genre, style or another related attribute will go a long way to helping you in the long run. You can also used colour coding for your folders and subfolders.
It's worth pointing out that doing this will take some time. But it's time worth investing! You might spend one evening sorting out all of your folders, subfolders and colour coding, but this will save you so much time in the long run. Setting yourself up with an organisation system is a guaranteed way to improve the efficiency of your workflow, and FL Studio's Browser is the perfect place for this.
So, hopeully you got some reall useful tips out of this guide. Thanks for checking with us here at flpstudio.com, and while you're here, be sure to check out the rest of our blog for more inspiring and educational content.
You should also check out our FL Studio Project Remakes, crafted by our international team of producers. You can download these to get your hands on some professional quality recreations of some of the biggest tunes in the EDM scene right now, and these will give you some really good ideas. Seeing what a finished track looks like is a great way to learn how to finish them yourselves!
Now, scroll down for some super useful additional FL Studio content!
! BONUS !
Comprehensive List of FL STUDIO Key Commands
|
SHORTCUT (WINDOWS) |
SHORTCUT (MAC) |
ACTION |
|---|---|---|
|
File Menu |
||
|
Ctrl + O |
Cmd + O |
Open file |
|
Ctrl + S |
Cmd + S |
Save file |
|
Ctrl + N |
Cmd + N |
Save new version |
|
Ctrl + Shift + S |
Cmd + Shift + S |
Save as |
|
Ctrl + Shift + M |
Cmd + Shift + M |
Export MIDI file |
|
Ctrl + Shift + R |
Cmd + Shift + R |
Export MP3 file |
|
Ctrl + R |
Cmd + R |
Export WAV file |
|
Ctrl + Shift + H |
Cmd + Shift + H |
Rearrange windows |
|
Ctrl + Z |
Cmd + Z |
Undo/redo last edit |
|
Ctrl + Alt + Z |
Cmd + Option + Z |
Undo step-by-step |
|
Window Navigation |
||
|
F1 |
F1 |
Help |
|
F5 |
F5 |
Toggle playlist |
|
F6 |
F6 |
Toggle step sequencer |
|
F7 |
F7 |
Toggle piano roll |
|
F8 |
F8 |
Open plugin picker |
|
F9 |
F9 |
Hide/show mixer |
|
F10 |
F10 |
Hide/show MIDI settings |
|
F11 |
F11 |
Hide/show song information window |
|
F12 |
F12 |
Close all windows |
|
Alt + F8 |
Option + F8 |
Hide/show sample browser |
|
Enter |
Enter |
Toggle min/max playlist |
|
Esc |
Esc |
Close window |
|
Tab |
Tab |
Cycle nested windows |
|
Ctrl + Shift + H |
Cmd + Shift + H |
Arrange windows |
|
Pattern Selector |
||
|
- |
- |
Previous pattern |
|
+ |
+ |
Next pattern |
|
Ctrl + F4 |
Cmd + F4 |
Next empty pattern |
|
F4 |
F4 |
Next empty pattern with naming dialog |
|
Piano Roll Action |
||
|
Ctrl + U |
Cmd + U |
Quick chop |
|
Ctrl + Q |
Cmd + Q |
Quick quantize |
|
Ctrl + M |
Cmd + M |
Import MIDI file |
|
Ctrl + L |
Cmd + L |
Quick legato |
|
Ctrl + D |
Cmd + D |
Deselect selection |
|
Ctrl + C |
Cmd + C |
Copy selection |
|
Ctr l+ Alt + G |
Cmd + Option + G |
Grid color |
|
Ctrl + Left click |
Cmd + Left click |
Select |
|
Ctrl + Shift + Left click |
Cmd + Shift + Left click |
Add to selection |
|
Alt + R |
Option + R |
Open randomize tool |
|
Alt + Q |
Option + Q |
Quantize |
|
Alt + O |
Option + O |
Open LFO tool when in lower event editor area |
|
Alt + M |
Option + M |
Mute selection |
|
Alt + L |
Option + L |
Open articulate tool |
|
Alt + K |
Option + K |
Open limit tool |
|
Alt + G |
Option + G |
Ungroup selected notes |
|
Alt + F |
Option + F |
Flam |
|
Alt + E |
Option + E |
Riff machine |
|
Alt + B |
Option + B |
View note helpers |
|
Alt + A |
Option + A |
Arpeggiator |
|
Alt + Shift + M |
Option + Shift + M |
Unmute selection |
|
Right-Alt + Right click |
Right Option + Right click |
Quantize selected |
|
Shift + Q |
Shift + Q |
Quick quantize |
|
Shift + N |
Shift + N |
Turn off selected chord |
|
Shift + I |
Shift + I |
Invert selection |
|
Shift + G |
Shift + G |
Group selected |
|
Shift + C |
Shift + C |
Select by color |
|
Shift + Ctrl + V |
Shift + Cmd + V |
Paste from MIDI clipboard |
|
Left-Shift + Right click |
Left Shift + Right click |
Pan view |
|
Double left click on note |
Double left click on note |
Open note properties |
|
Page up / Page down |
Page up / Page down |
Zoom in/out |
|
Draw tool + Shift |
Draw tool + Shift |
Extend note length |
|
Channel Rack and Step Sequencer |
||
|
Up arrow |
Up arrow |
Select next channel above |
|
Down arrow |
Down arrow |
Select next channel below |
|
Page up |
Page Up |
Select next channel group |
|
Page down |
Page Down |
Select previous channel group |
|
Alt + Del |
Option + Del |
Delete selected channels |
|
Alt + Up arrow |
Option + Up arrow |
Move selected channels up |
|
Alt + Down arrow |
Option + Down arrow |
Move selected channels down |
|
Alt + Z |
Option + Z |
Zip selected channels |
|
Alt + U |
Option + U |
Unzip selected channels |
|
Alt + G |
Option + G |
Group selected channels |
|
Alt + C |
Option + C |
Clone selected channels |
|
Alt + M |
Option + M |
Toggle mixer track selectors |
|
Ctrl + Alt + R |
Cmd + Option + R |
Force-restretch all audio clip channels |
|
Ctrl + Enter |
Cmd + Enter |
Focus playlist |
|
Ctrl + C |
Cmd + C |
Copy channel steps/score |
|
Shift + Mouse wheel |
Shift + Mouse wheel |
Move selected channel up/down |
|
Shift + Up arrow |
Shift + Up arrow |
Move channel selection up |
|
Shift + Down arrow |
Shift + Down arrow |
Move channel selection down |
|
Shift + Ctrl + Left arrow |
Shift + Cmd + Left arrow |
Shift steps left |
|
Shift + Ctrl + Right arrow |
Shift + Cmd + Right arrow |
Shift steps right |
|
Record, Playback, and Transport |
||
|
Space |
Space |
Start/stop playback |
|
Ctrl + Space |
Cmd + Space |
Start/pause playback |
|
Backspace |
Backspace |
Toggle line/none snap |
|
L |
L |
Switch pattern/song mode |
|
R |
R |
Switch on/off recording (including during playback) |
|
Ctrl + T |
Cmd + T |
Toggle typing keypad to piano keypad |
|
Ctrl + M |
Cmd + M |
Toggle metronome |
|
Ctrl + P |
Cmd + P |
Toggle recording metronome precount |
|
Ctrl + I |
Cmd + I |
Toggle wait for input to start recording |
|
Ctrl + B |
Cmd + B |
Toggle blend notes |
|
Ctrl + E |
Cmd + E |
Toggle step edit mode |
|
Ctrl + H |
Cmd + H |
Stop sound |
|
Mixer |
||
|
F2 |
F2 |
Rename selected mixer track |
|
Shift + Mouse wheel |
Shift + Mouse wheel |
Move selected mixer tracks left/right |
|
Ctrl + Shift + Left click |
Cmd + Shift + Left-click |
Select multiple mixer tracks |
|
Ctrl + Shift + S |
Cmd + Shift + S |
Save mixer track state |
|
Ctrl + L |
Cmd + L |
Link selected channels to selected mixer track |
|
Shift + Ctrl + L |
Shift + Cmd + L |
Link selected channels beginning from selected mixer track |
|
Alt + Left arrow / Right arrow |
Option + Left arrow / Right arrow |
Move selected mixer tracks left/right |
|
Alt + L |
Option + L |
Select the channels linked to the selected mixer track |
|
Alt + W |
Option + W |
Toggle peak-meter 'wave' view |
|
S |
S |
Solo current track |
|
Alt + R |
Option + R |
Render armed tracks to WAV |
|
Playlist Action |
||
|
Z |
Z |
Zoom tool |
|
Y |
Y |
Playback tool |
|
T |
T |
Mute tool |
|
S |
S |
Slip edit tool |
|
P |
P |
Draw tool (pencil) |
|
E |
E |
Select tool |
|
D |
D |
Delete tool |
|
C |
C |
Slice tool |
|
B |
B |
Paint tool |
|
Alt + T |
Option + T |
Add time marker |
|
Alt + P |
Option + P |
Open the picker panel |
|
Alt + M |
Option + M |
Mute selection |
|
Alt + G |
Option + G |
Ungroup selection |
|
Alt |
Option |
Bypass snap (can be combined with other modifiers) |