Pitch Correction in FL Studio
Posted by Esteban Miranda on
Pitch correction is a ubiquitous effect in music production today. Whether it’s sitting at the forefront of a mix, guiding vocals along jumpy robotic melodies a la Kanye West or Cher, or subtly working in the background to round out edges of a vocal performance, pitch correction is a popular tool for producers both professional and novice.
But there are so many options to choose from, and if you’re not able to pay the premium prices of some of the dedicated pitch correction plug ins, you are left hoping that your DAW has a pitch correction plug in of its own that can hold its weight against the higher tier options.
In FL Studio, you’re given NewTone, a versatile pitch correction plug in that can do a lot of exciting things. So let’s dive in and take a look at what your options are.
Pitch Correction in Music Production
What many people probably don’t realise is how much pitch correction will actually go into modern vocal production, even if they don’t think there has been any. This is in part due to the nature of how we listen to and consume our music. Fundamentally, a studio recording is different from a live performance. If you have a background in music performance, chances are you’ve been told countless times that if you mess up on stage, just keep going because people will either not notice, or they will forget. However, a studio recording of a song by a chart topping artist will be listened to millions of times for years and years, so mistakes don’t have the luxury of going unnoticed! This is where pitch correction comes in.
It’s worth noting at this point that not all scenarios call for pitch correction. Many records have benefitted from a vocal performance that sounds more rough around the edges as this can often help to convey emotion or sincerity, and especially in genres such as folk or singer songwriter, an artificially pitch-altered performance could sound out of place (though you do hear it in some unusual places). However, let’s not get ahead of ourselves.
There are two big players in the pitch correction game, one of them is Antares Autotune and the other is Melodyne. FL Studio’s NewTone is very similar to Melodyne, so at the end of this article we will do a comparison of the two.
Let’s jump in and have a look at NewTone, how it works and what it allows you to do!
NewTone

NewTone is FL Studio’s fully integrated pitch correction plug in. It has been not unfairly called a stock plugin alternative to Melodyne, and with its similar interface and features, this is an accurate comparison.
There are generally two ways that pitch correction works, one is Auto Tune’s style of setting a predetermined scale and then automatically correcting any incoming audio signal to that scale, while the other is the Melodyne (and NewTone) do things.
Using NewTone requires you to drag in an audio clip, so this could be from your browser or, if you want to use a track from in your FL Studio project, you can export it out and then drag it into the NewTone effect. When you open up NewTone you will notice any audio is displayed on a piano roll interface, with block notes representing the rhythm and approximate pitch of each note, while an orange line displays pitch variations in each note.
This is familiar to music producers as the piano roll is how we write and display melodies in MIDI form, so it’s a super useful element of pitch correction; giving you a visual guide on the pitches of your audio.
NewTone’s player is separate from FL Studio’s playback, so you can isolate the audio you’re working on and just listen to that. However, you can link the two, so FL’s transport playback will also control the playback of NewTone.
Editing Pitch
If you want to edit the pitch of the notes in NewTone, all you have to do is hover over each individual note block, and you can move it either up or down. NewTone then gives you a small hovering box that shows precise contextual information, displaying the updated pitch as you move it.
By dragging either side of the note, you can edit the length of the note. However, it’s worth pointing out that this also changes the length of the notes either side of it.
Now, the orange line on each note represents the variation in pitch on each note, because as we know, humans don’t sing perfectly in tune. (If we did, no one would have needed to invent pitch correction!) So the orange line is the pitch variation, and each note will have an orange outline showing the representative pitch that the note is playing at. The filled orange block then shows the nearest correct pitch to the note in question. You can shift a note to the nearest correct pitch by right clicking.
Global Controls
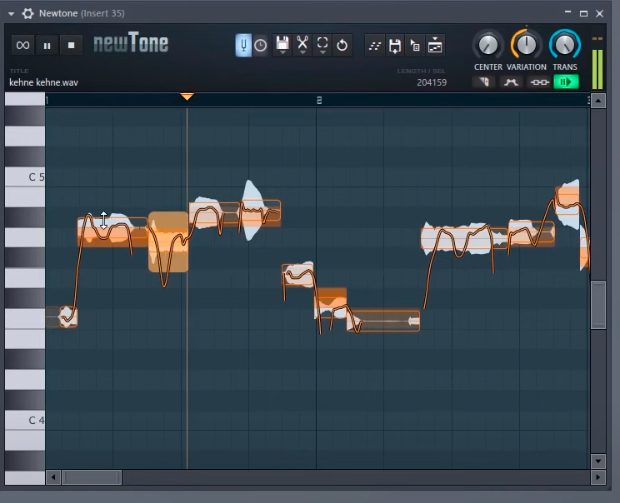
There are three global parameters for NewTone. These are Center, Variation and Trans.
What do they do?
- Center - This controls the movements of the notes to their detected pitch center, this is the filled orange box on the display.
- Variation - This control allows tweaking of the modulation or vibrato of the performance.
- Transition - This is the way notes transition from one another, so you can choose between a jump or a gradual change.
Tweak these controls to achieve your desired results with the pitch!
Advanced Mode
NewTone also has an Advanced Mode, which allows you more precise control and more options. The second button under the variance knob on the right activates this, and it will light up purple when enabled. Now, when hovering over notes you have more advanced controls that sit on three layers.
The top layer allows you to control volume. You can control the volume of the note, as well as ramp in and out adjustments. This level of volume editing allows precise ways to edit the clip instead of using automation.
The middle layer allows control over the pitch position, shift and formant. Formant filters are great for adjusting the character of an audio clip.
The bottom layer is pitch variation in the middle, and pitch in and out on the left and right. This one controls how the pitch variation sounds, from auto-tune level of correction to more vibrato.
Overall impression
NewTone is a versatile and detailed pitch correction plugin. It’s perfect for tidying up vocals, whether subtle or drastic results is what you’re after. The piano roll interface is super helpful, and the precise controls give you so much detail to work with.
As with all pitch correction, though, there’s a fine line between doing it and overdoing it, and it’s all down to tweaking the controls and the sound within the context of your music to get the results you’re after.
Melodyne

So, if you’re familiar with Melodyne, you’ll recognise quite a lot of the features in NewTone. There’s no denying that NewTone is a watered down version of Melodyne, giving the same style of control over pitch correction.
As we mentioned earlier, there are two main types of pitch correction. Auto-Tune’s pre-determined scale processes incoming audio and corrects it automatically to that scale, many DAW’s built in pitch correction plugins emulate this style. Melodyne’s, on the other hand, uses a piano roll interface, showing note pitch data and rhythm information, allowing intricate and precise control over many parameters.
NewTone uses Melodyne’s style of pitch correction. And it does it well. While it’s not as detailed as Melodyne, you’re still getting a taster. Melodyne allows more control over various aspects of the correcting process, while NewTone is a more stripped back version.
But if you’re looking for a pitch correction solution and you’re not able to get hold of Melodyne, then NewTone is a great option to use on your productions!
_____
Thanks for checking in with us here at flpstudio.com, and make sure to check out the rest of our blog for music production resources, as well as our store when you can get FL Project files to help you learn how the pros put together their big hits!