Sytrus vs Serum
Posted by Esteban Miranda on
`The world of software synths can often be overwhelming for us music producers. WIth our DAWs coming with a bundle of native built in synths, and a huge amount of third party synths available it can be difficult to know where to start.
Getting your head round this can be tricky, but in this article we are going to do our best to help you get to grips with two of the big players in synthesis for FL Studio producers.
Sytrus is FL Studio’s built in synthesiser which comes with Producer Edition and upwards. with a range of neat features available. It is a hybrid synth, meaning it has capabilities for FM, RM and Subtractive synthesis. It’s a versatile synth suited for a lot of applications.
Serum on the other hand is a third party synth by Xfer Records. It’s a wavetable software synthesiser. It has high quality sounds, a lot of complexity hidden under its beautiful visual display and stands out in the world of software synths as one of the most acclaimed synths out there.
But as we said at the beginning, there are many many software synths, so how can you know which one to choose?
In this article we are going to give an overview of both Sytrus and Serum, and compare them both. Hopefully this will give you a good idea of the ins and outs of these synthesisers, and you’ll know which one would suit your workflow best.
Sytrus
Sytrus is powerful and versatile. It features six oscillators (also called operators) which are customisable. It can perform Frequency Modulation (FM), Ring Modulation/Amplitude Modulation (RM), Subtractive and Additive synthesis. If this sounds complicated straight out of the gate, here’s a handy guide.
Frequency Modulation - This is a form of synthesis where the frequency of the waveform is changed by modulation.
Ring Modulation - This is a type of amplitude modulation, where the carrier and modulation signals balance out so that the original carrier and modulation frequencies disappear from the output, so only the sum and difference are left.
Subtractive Synthesis - This is a method of synthesis in which partials of an audio signal (often one rich in harmonics) are attenuated by a filter to alter the timbre of the sound.
Additive Synthesis - This is a method of synthesis that creates a sound by adding sine waves together. There are lots of overtones or partials in this type of synthesis.
So, based on those brief summaries, you can see already that Sytrus has a ton of capabilities built in. As well as those types of synthesis, Sytrus has 3 filter modules, an effects module with chorus, three delay lines and unique Unison envelopes which are programmable per-voice.
It’s clear that Sytrus is a very flexible and versatile machine. But with this flexibility there comes an undeniable level of complexity. It can be daunting at first, but as with all software synths, there’s a learning curve. But once you get to grips with Sytrus, it can be an extremely rewarding plugin.
Let’s look at it in some more detail.
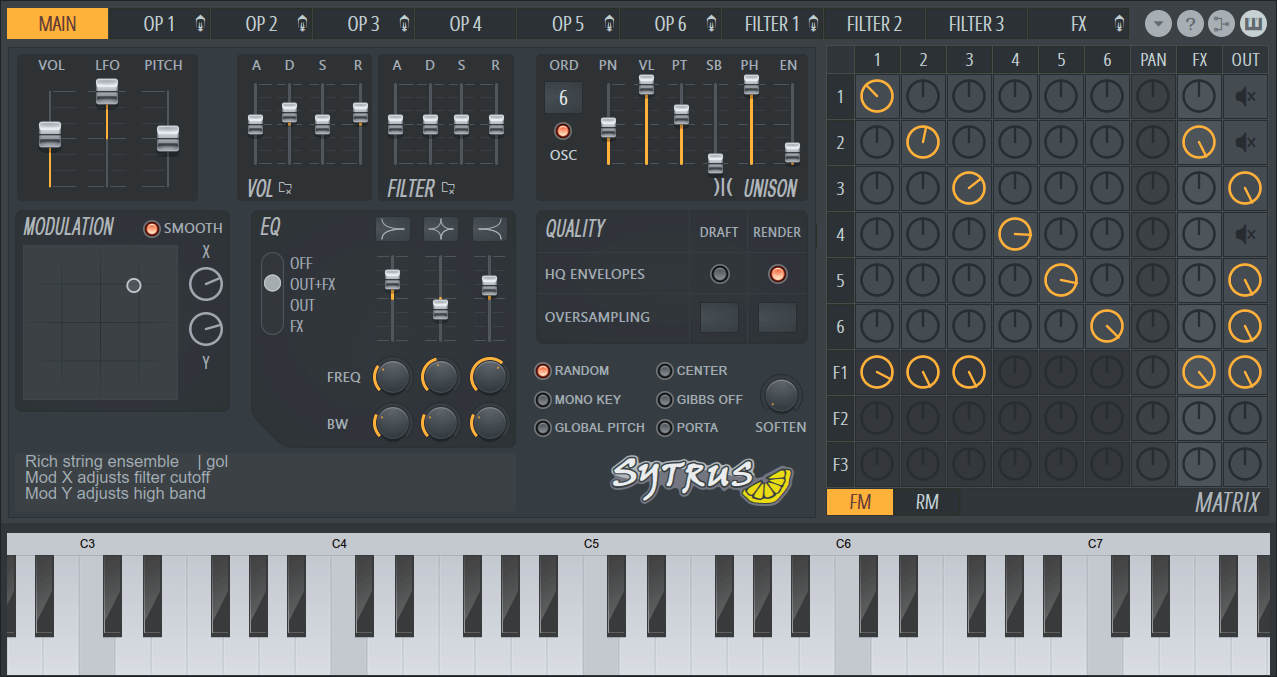
The Main Module
Sytrus’ main module is where you see the global settings for whatever patch you’re working on. If you’re not super experienced with software synths, it provides an easy overview of the filter and volume envelope levels. This allows easy adjusting and tweaking to your preferences, even if you’re lacking serious FM synth programming knowledge.
The controls will be familiar to anyone who’s seen their fair share of softsynths, but we will summarise anyway.
Master Levels - Here you have sliders for the volume, the LFO (with a range from -128 up to 128) and a Pitch slider, with options from +2 to -2 octaves.
Global Volume Envelope Levels - Within the patch you will have different modules, and this section allows you to define global offsets to the volume envelopes of each module. The controls are ADSR, or Attack, Decay, Sustain and Release.
Global Filter Envelope Levels - With the same interface as the Volume envelopes, but applying their effects to the filters. These affect the cutoff or resonance filter envelopes in the patch.
Unison Mode - This section is highly customisable, giving Sytrus some of its signature character. It allows you to add depth and texture to even the simple sounds. It works by triggering a user-defined number of ‘subvoices’ for each note that you play. These subvoices can have slight variations or panning, volume, pitch or phasing to give a thicker, softer sound with a rich stereo spread.
Unison Mode is unique to Sytrus, so here is the rundown of each control from Image Line themselves.
- Unison Order (ORD) - Sets the number of voices in the unison (drag up-down). To turn off (default), drag down until the indicator disappears.
- OSC - CPU saver. Merges unison voices before passing through a single filter as opposed to multiple independent filter paths when the switch is off. The result is a CPU saving mono unison that is the same number of unison voices as the normal unison but with no stereo spread.
- Unison Panning (PN) - Sets the panning variation across the unison voices.
- Unison Volume (VL) - Sets the volume level variation across the unison voices (the closer to the center a voice is, the louder it will sound).
- Unison Pitch (PT) - Sets the pitch variation (detune) across the unison voices.
- Unison Sub-Level (SB) - If set higher than zero, a duplicate for each unison voice is created, with a pitch offset of -1 octave. This parameter sets the volume of the sub-level voices.
- Unison Phase (PH) - Sets the initial oscillator phase variation across the unison voices.
- Envelope variation (EV) - Sets the amount of variation added to the attack and decay of the filter cutoff, resonance and volume envelopes of each unison voice.
Sytrus also has a Modulation X/Y Controller. This represents two adjustable controllers, horizontal and vertical, which can be linked to real time parameters within Sytrus. These values can be selected on a wide range of parameters.
There is also an Equaliser (EQ) which uses 3 band parametric frequency adjustments to provide a range of filtering effects.
Sytrus is a versatile and powerful synthesiser with a range of other controls, and you can dive into the manual to get a full detailed overview of them. But how can you apply this?
Using Sytrus - What makes it stand out?
Image Line’s powerful synths offer everything you can find in classic FM Synths, and it supports up to six operators and a modulation matrix which allows you to define the synthesis algorithm. In case this sounds like a lot of technical jargon, it means that you have a lot of control over what this synth can do.
There are a set of advanced features which help you create your own unique sounds. They are:
- Custom Oscillator Shape - The oscillator shape of each operator (remember this is an interchangeable term for oscillator) can be adjusted in a number of ways, such as adding harmonics, morphing to square or triangle waves, pulse width, add noise, etc. An operator can also be set to generate plucked string tones with a fully customizable damping envelope, which can be really useful for strings and pads.
- Ring Modulation - Besides FM and additive mixing, Sytrus operators can also interact in Ring Modulation (RM) mode. Ring Modulation is the process by which two input signals are multiplied together to produce a new sound, often with characteristics which are qualitatively different from the original input signals.
- Support for Subtractive Synthesis - Sytrus includes three fully-featured SVF (filter) modules which can be used to filter the operators' output. By combining both additive (FM/RM) and subtractive (SVF) synthesis techniques, Sytrus offers a very flexible means of producing a wide range of sounds, without the need for additional plugins or processing.
- Effects Module - Offers a range of effects to treat the patch sound, including three delay lines (which can process in parallel or serial mode) and a high-quality chorus effect to add depth to Sytrus patches. The signal from the effects module can also be sent to a mixer send track for additional processing.
- Fully Customizable Articulation - Mapping diagrams, LFO and envelopes in Sytrus extend far beyond simple ADSR volume envelope support. Each diagram and envelope state can consist of an unlimited number of curve segments, with control of pitch, volume, panning, velocity mapping, and unison settings, etc. This allows for more complex patch structures, including even programming whole drum and synth loops into a single patch/voice.
- Programmable Unison Mode - Supports sub-level voices, variable pitch, pan, volume and envelope variation. Uniquely, each property targeted in the articulation sections of the modules can be mapped by the patch creator to the unison voices following 100% customizable mapping graphs, which allows almost every voice in the unison to have different properties (for more information, see the main module).
So, you can see from the overview above that Sytrus is a powerful and versatile machine, capable of producing a wide range of sounds with a whole host of customisable parameters. It’s as appropriate creating a bass sound as it is a lush thick pad, so get creative when experimenting with this synth so see what it can come up with!
Now, let’s take a look at Xfer’s Serum, and see how it compares.
Xfer’s Serum

Xfer Records’ Serum is a wavetable synth. This is a synthesis technique which relies on periodic reproduction of a single cycle waveform. NI’s Massive is a huge machine in the forefront of wavetable synthesis, and is a precursor for Serum itself.
Often confused with sample-based synthesis, Wavetable synthesis uses a single sound as the primary source for each oscillator. But where the difference between straight up sampling lies is in the ability to adjust and morph the sound.
Musicradar gives this great overview of how Wavetable synthesis works:
“Without movement or modulation, a wavetable synth is effectively no different than a sample-based synth that reads a static waveform. However, the stacked frames of a wavetable allow it to transform from one wave shape to another as you play.
In analogue terms, that could mean having an oscillator that morphs from a saw wave at one end of a wavetable to a square at the other. In creative terms it lets users incorporate textural elements such as rain or static noise, or capture the inconsistencies that come from an acoustic instrument.
The key differences between wavetable synths lies in the methods used to play back and modulate the wavetables themselves. Massive successor, Massive X, for example, features ten different playback modes that each read, filter and modulate the wavetable differently.
Beyond the oscillators, wavetable synths tend to adhere to classic subtractive synth structure, using filters, an envelope-controlled amp and onboard effects. Due to the emphasis on movement though, wavetable synths tend to come with modulation options, certainly including LFOs and envelopes, often joined by more complex sequencers and modulation generators.”
So, it’s quite different from the other modes of synthesis. But now that we have an understanding of that, let’s look into Serum’s features.
Understanding the basics
Serum isn’t just compatible with FL Studio. It works with Ableton Live, Logic Pro and many other DAWs. There is also a free trial available so you can try it out before you commit to purchasing. It is also compatible with both Mac OS and Windows.
You can grab it on Splice, and after your free trial ends it is $9.99 per month for 19 months, and then you own it.
So, let’s have a look at why you’d want to use Serum in your productions.
Waves
We briefly mentioned earlier that Wavetable synthesis is often confused with sample based synthesis. Well with Serum there’s no need to be confused, because you can also use it as a sampler. Introduce your own sound or sample and you can use the wavetable editor to modify it and create new sounds.
Otherwise, Serum uses its Wavetable to generate pre-designed or custom waveforms. These are the basis for the patch within Serum. There are tonnes of options for tweaking and moulding the sound to your tastes, but if you get overwhelmed and daunted by the idea of complex sound design, don’t worry.
Serum has a wide range of high quality presets, all of which are editable. So if you don’t want to build your own sounds from scratch, you can load up a preset as your jump off point and begin editing from there. With 450 presets and 144 wavetables, which are all compartmentalised based on category, there is a lot of material to work with.
Editing Your Sounds

Serum’s interface is organised into tabs, which are Oscillator, FX, Matrix and Global. Each of these controls a different section of the editing process.
Serum Developer Steve Duda said when creating Serum he wanted to create something ‘visual, so that you weren’t lost and felt like you were staring at a wall of knobs’.
This is a key part of the features of Serum, a lot of the design and flow of the synth is very visually intuitive, allowing clear distinctions between sections and routing. There is even a built in link to the Manual PDF within the synth itself, so there’s no excuse not to know the synth inside out!
The Oscillator page is where the main four Oscillators live. There are two main Wavetable Oscillators, which have the multi-tables, allowing you to load in wavetables and build sounds that really evolve over time. There are also two additional Oscillators, a Sub Oscillator and a Noise Oscillator.
There’s also a Filter on the right of the main panel, with intuitive routing to link the Oscillators to the filter in various ways.
Below the Oscillators and Filter, there is a Modulation section which allows clear routing and assignments. There are Macro knobs, three envelopes, four LFOs and all of these can be selected and edited easily, and there is a simple “drag and drop” feature. Click a part of the Modulator, drag it over a parameter control you want to assign it to, and drop it there.
The FX page is fairly self explanatory, along the left side of the page is a vertical list of greyed out effects, which you can toggle on or off, and re order. Toggling an effect brings up a control menu for that effect, so you can adjust the parameters to your liking.
The Matrix page shows a detailed list of all of the Modulation routings you’ve created in your patch. So for example, if you had dragged the LFO 1 to Modulate the filter’s Cutoff, this would appear in the list on the Modulation Matrix window. There are also controls for Aux sources for your modulation routings.
It’s a clear and concise way to view all of the routing assignments going on within your patch.
The final page, Global, is a page for some of the other finer controls which ‘wouldn’t quite fit in the other pages’ according to Dude ‘the advanced settings for Serum’. These include two Chaos settings, as well as Advanced Oscillators and Global Preferences.
Going Deeper
Despite its visual elements and focus on usability, Serum is still a complex synthesiser packing a lot of punch.
If you’re wanting to get a real deep dive into the synth, Icon Collective has a great series of videos on Youtube in which Serum creator Steve Duda goes in depth explaining the features and sections of Serum. The passion that went into Serum’s creation is obvious to see, and hearing him speak about his synth is a great way to understand not only the functions of the synthesiser, but why the specific controls work in the way that they do.
And as we previously pointed out, Serum contains a direct link to a PDF of the Manual within the synth itself, which is great for quickly referencing anything you need to understand.
Final Thoughts
There is always a stigma when it comes to comparing a stock plugin (meaning one that comes built into a DAW) with a third party synth. Some people think that a third party synth has more focus and attention into its development, because the creators aren’t distracted by creating an entire DAW as well. Others are perfectly happy using built in plugins which come with their DAW of choice.
There isn’t always a clear answer as to which is best for you to use.
Sytrus is a powerful synth, but can be quite overwhelming and the workflow isn’t as user friendly as it could be. Many users also claim that it can be quite intimidating, with the modulation capabilities being hidden behind layers of complexity.
Serum, on the other hand, is designed to be as intuitive as possible, with a very visual focused work flow and easy to learn features. The modulation options are also extremely visual and intuitive, with one user stating ‘Control routings and modulations that would be a breeze in Serum take quite a bit of clicking around in Sytrus’. Another plus in favour of Serum is that it is regularly updated with new features.
This focus on user-friendly features and easy workflow does not, however, mean that Serum is a “beginner’s” synth. It is capable of a whole lot, and is a useful tool in anyone’s arsenal.
Many users report that the workflow in Serum is much easier and intuitive, but also that the price point can be a daunting issue, despite the rent to own model (which allows you to pause payments and resume them as suits you).
The final word we will say on this is that as always, the capabilities of the machine are largely affected by those of the user. So producers can create equally good music with either Serum or Sytrus. It isn’t always about the choice of tools you use, because that discussion could be endless. There are many software synths out there.
The biggest thing to consider here is how well you know your synths. Hopefully this overview has given you a good idea on the workings of both Sytrus and Serum. If you already own FL Studio Producer Edition and upwards, Sytrus is already in your arsenal. Maybe you already own Serum too, but haven’t quite taken the time to really explore what it’s capable of.
The key is learning how to use the tools you have, not expecting some fancy new synth to answer all your questions and solve all your problems when it comes to production.
As with everything, you will find some people who swear by Sytrus, and others who swear by Serum. Whichever you choose is up to, but hopefully we helped you with that decision.
As always, thanks for checking in with us here at flpstudio.com, and be sure to check out the rest of our site for some awesome project templates and other tutorials, guides and resources to help you on your music production journey!